
TP-Link Archer BE800 BE19000 Tri-Band Wi-Fi 7 Router Installation Process
TP-Link archer routers, equipped with the latest generation, WiFi 7 technology have come about as absolute gamechangers. With lightning fast internet speeds, and features designed to match even the most expensive router on the market, the TP Link BE19000 WiFi 7 routers have been accepted with open arms. If your most recent buy is the TP-Link BE19000 WiFi 7 Router setup, learning how to set up Archer BE800 will come in handy. This blog will detail all information you need to learn about the setup and configuration process and resolving any network or configuration related issues that might crop up.
TPLink Archer BE800 Router Setup
The setup process starts with collecting the equipment and some details related to the device. This is the archer router itself, the nodes/satellite devices that come along with the device, the tp link be19000 wifi 7 router setup password and username. These details are available either on the product label you see on the device, or in the product manual that arrives with the device. If you don’t find these details there, you can always use ‘admin’ as the default username and password. Once you have the details, you can proceed with the setup and installation process.

Starting with the basic installation
To start with the device setup, you’ll need to set things up. Here are some steps you can follow:
- Connect the ethernet cable from the ISP provided MODEM to the LAN port on your router. After this is done, connect another ethernet cable between the LAN port on your router to the ethernet port on a computer.
- Once connected, connect the power cord to the ‘Power In’ port on the TP-Link Archer router and the power adapter to the power outlet in your home.
- Turn on the power supply and press the Power on/off button on the device. You will now see the power LED light up and the device boot up. Allow some time for the device to turn itself on and then proceed with the configuration steps.
Tplink Archer BE800 Router Login Process
- Connect your TP-Link Archer BE800 router to a computer using an ethernet cable. You can also use a wireless WiFi based connection to connect your router and the computer/smartphone/tablet.
- Once the two are connected, open a web browser on the computer or connected device. You can use Google Chrome, Microsoft Edge, Mozilla Firefox, or Apple Safari as well.
- Now, type in the default web address tplinkwifi.net or the default IP address 192.168.0.1 or 192.168.1.1 to access the TP-Link archer router login page. Press Enter and the browser will redirect you to the same.
- On the login page, type in the default username and the TP Link Archer BE800 router setup password details in the respective fields and click on the login button.
- The login wizard will validate the details you have entered and then redirect you to the main router setup wizard online.
How to Setup TP-Link BE19000 WiFi Router?
- While you are on the tplinklogin.net login page, click on Network and then go to the WAN menu on the left of the screen.
- In the WAN connection type menu, change the selection to PPPoE.
- Now, in the PPPoE Connection menu that is visible below, enter the username and the password details provided to you by your ISP.
- Once entered, click on the Save button at the bottom. This will trigger the internet connection.
Tip: Contact your ISP in case you do not have the username and password details.
- Wait for a minute or two and check the Status of your connection in the Status Tab. If the WAN section displays some values in the IP, subnet mask, gateway and server fields, you have a working internet connection.
- If you don’t see any details there, and are not able to access the internet, you may need to power cycle your TPLink Archer BE800 Router setup. To do so, follow the steps:
- Turn off the DSL MODEM, then your router and then the computer system. Allow them to remain off for about 2 minutes.
- Now, turn on the DSL MODEM and allow it to get ready. As soon as it does, turn on the router and the computer system as well.
This will help you gain access to the internet easily.
How to setup TP Link router without ethernet cable?
While you may be struggling to obtain the IP details from your ISP and find yourself stuck with the WAN like settings, there’s an easy way you can complete the setup without www.tplinkwifi.net. Here’s how to setup your tp link router without an ethernet cable:
You can complete the TP-Link router setup using the Tether App. For this, you will need to download the latest version of the same on your iOS or Android device. If you already have the app, make sure you have the latest version.
When you are ready to begin, go to the Wi-Fi section on your phone and connect to the router network. Key in the required details like the username and the password which can be found on the bottom panel of your TP-Link Archer BE800 BE19000 Tri-Band Wi-Fi 7 Router device.
- Now, when you are connected, open the Tether App.
- The App will automatically detect a router in reach. You will see your router name under the Local Devices section.
- Note: if you are prompted by the app to login or change the password details, you can use admin in both the username and password fields.
- The Quick Setup wizard will launch when you click on the router icon.
- Choose the internet connection type and click on the Next button on the top right side of the screen.
- In the next step, you can change the name of your network and the password as well.
- Review the settings that you make and then finally click on the Save button.
- Wait for the configuration to be saved and click on the Finished button.

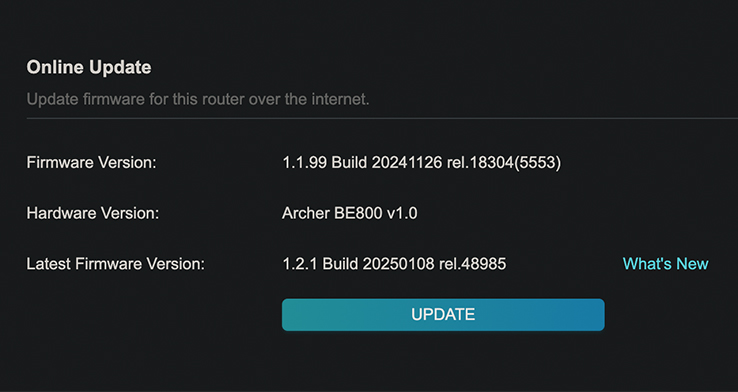
TP Link Archer BE800 Firmware Update Process
Having an updated firmware file downloaded and installed on your router is key to having stable internet speeds. This is not only important for speed but also in terms of information security. If you wish to protect your data from being leaked online, making the latest firmware update is important. If you feel your TP-Link router is not performing up to the mark, here are some steps you should follow:
Visit the TP-Link website and download the latest firmware file for your TP-Link BE19000 WiFi 7 Router setup. You can do that by visiting the download center, making the appropriate selection from the drop-down and selecting the correct hardware version. Now, click on the Firmware button and a list of available firmware updates will be displayed.
- You’ll need to extract the firmware from the downloaded ZIP file.
- Log in to the tp link quick setup wizard online.
- Go to the System Tools menu and click on the Firmware Upgrade option.
- Click on the Browse/ Choose File option to find the extracted firmware file and click on the Open button.
- Once the file is uploaded, click on the Upgrade button. The device will reboot automatically after the upgrade is finished.
- Click on the Status button to check if the firmware version is updated.
Note: When you update the firmware, your Tplink Archer BE800 Router setup may RESET itself. You will just need to follow the setup process again using the tp link quick setup wizard.
TP Link BE19000 WiFi 7 Router not working after Reset
If your TP-Link BE19000 WiFi 7 router is not working after you have reset it, there may be some issues with the device network settings. Since the network settings get deleted from the reset process, you will need to reconfigure the internet settings again. You can follow the steps as discussed above to do the same.
You will also need to follow the reconfiguration process after TP Link BE19000 wifi 7 router setup password reset process.
The Final Word
Connecting the TP-Link BE19000 WiFi 7 router to the internet and enjoying faster internet speeds is easy when you follow the right steps. The information we shared related to how to connect tp link wireless router to the internet will help you configure the network settings easily.